After we downloaded and started testing iOS 11 beta on iPhone, we found a nice iOS built-in feature Screen Recording. We love this feature because it makes screen capture so easy without using QuickTime or other third-party apps. And now the iOS 11 final version is available, you can also enjoy this feature after installing it via OTA or iTunes.
Related:How to record iPhone screen with QuickTime.
In this post, we will talk about how to record screen of iPhone iPad with the iOS 11 built in Screen Recording feature, and give you the step-by-step tutorial. Of course if the you can’t record screen in iOS 11, you can comment your question on the below section to discuss.
About “iOS 11 Screen Recording”
Before iOS 11, you have to use third-party Screen Recorder apps to do the recording job. And some of them are not free. Now, the new iOS 11 gives you a convenient way to capture screen on iOS device with the Screen Recording feature, which is easy and completely free.
This iOS 11 built-in feature appears on Control Center panel. After you installing iOS 11, you can simply go to Control Center and use this feature to capture what’s going on on your iPhone/iPad, and save records as video files which you can later share to other people or upload to website like YouTube.
How to Enable Screen Recording in iOS 11
Step 1. Run Settings app.
Step 2. Tap Control Center > More Controls.
Step 3. Tap the Geen “+” on the left of Screen Recording to add it to Control Center.
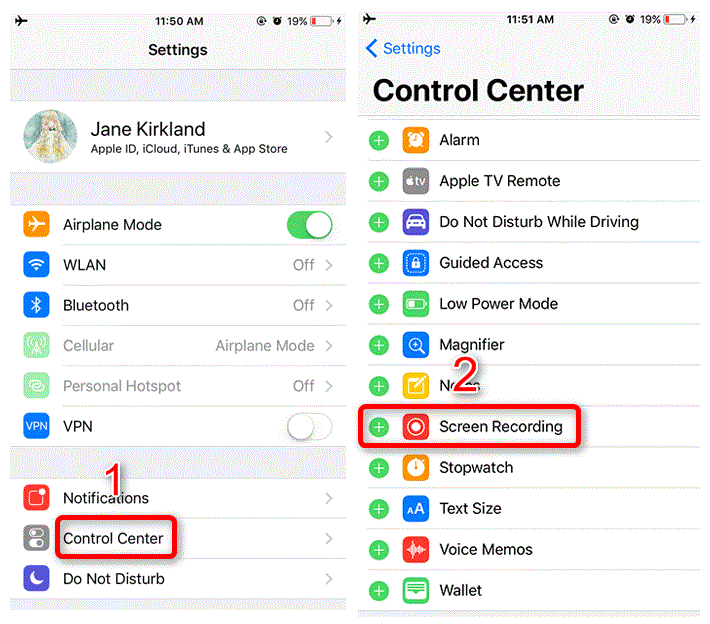
How to Start Capturing Screen of iPhone with Screen Recording in iOS 11
Step 1. Access Control Center by swiping up from the bottom edge of screen on your iPhone.
Step 2. Tap “Screen Recording” icon to start capturing your iPhone screen. If it success to record, the icon will turn to red just like the screenshot shows.
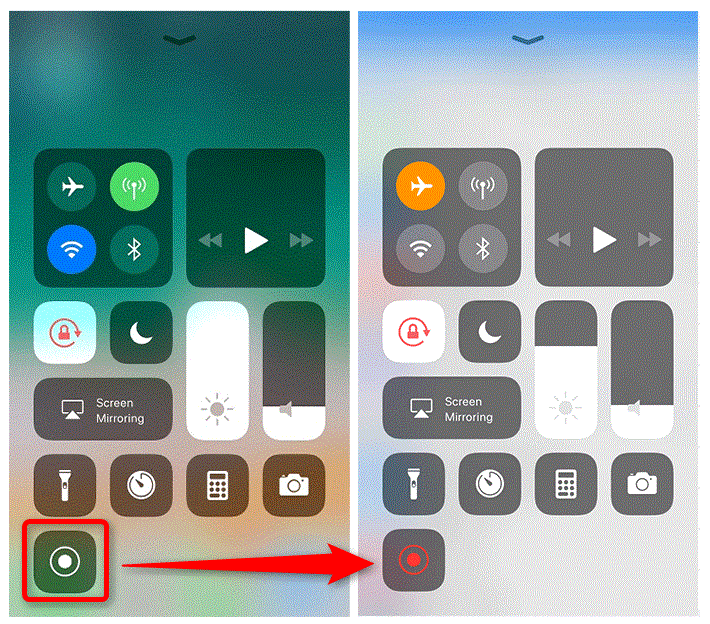
Tip: This built-in screen recording feature also enables you to choose whether add audios to your video recording. After swiping up to get the control center, just hold the “Screen Recording” icon to choose whether record iPhone iPad screen with audio.
How to Stop Recording Screen in iOS 11
To stop recording, tap the status bar. It will pop up a box that enables you to stop recording your iPhone screen.
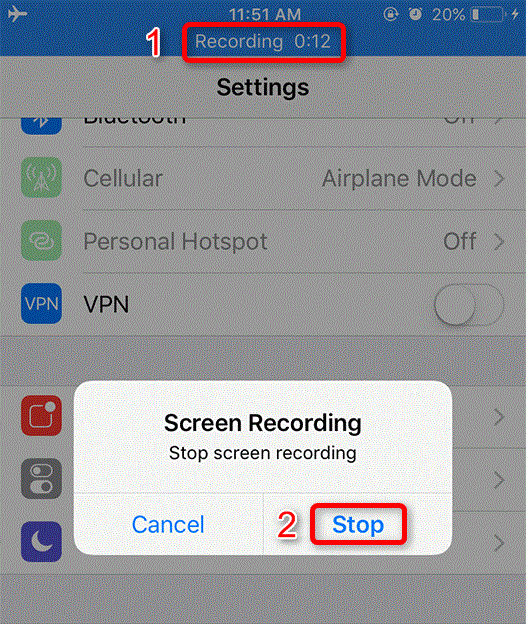
After you tap Stop, there will be a notification said at the top of the screen reminds you the screen recording video is saved to Photos app. Just open your Photos app to check all Screen Recording videos. Besides there are other methods to stop screen recording on iOS 11 devices.
3 ways to Stop #ScreenRecording in #iOS11,
1⃣Press Power button.
2⃣Tap the status bar.
3⃣Use the control center.— iTipBox (@itipbox) September 22, 2017
July 13 Update:
You’re Also Able to Live Broadcast Your Screen in iOS 11
In addition to record your iPhone screen, you will be able to live stream what’s on your screen to YouTube, Amazon Twitch, or other third-party apps via iOS 11 native screen broadcast functionality.
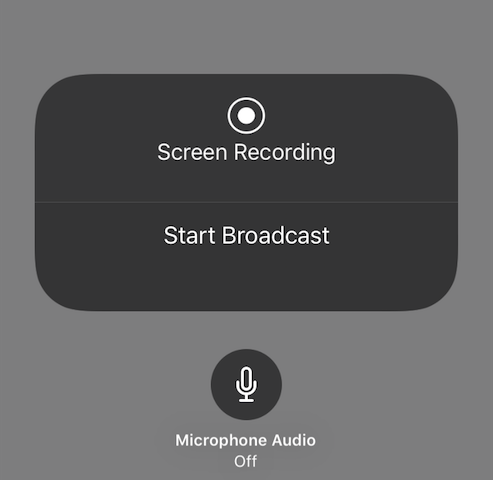
There is Start Broadcast option that can be accessed by long-pressing the record button in Control Center, and it was introduced since the third beta of iOS 11 for developers. And now you can get it in iOS 11 final version.
I haven’t got Any notifications… Help me please I’m on IPad Air
Hi Enzo, thanks for your response on this post. And I tested the iOS 11 screen recording feature on my iPad mini 2 and found it also got the issue like you, my iPad won’t save the screen recording to my Photos app. And I restarted my iPad, and it still didn’t work. I think it’s a bug happens on iPad.
But the recording feature did work on my iPhone 6s in iOS 11. And after you stops recording your screen, it will pop up notification telling you all recorded videos saved to Photos. Let’s wait for the next betas to solve this bug.
Any idea where the notification settings are for Screen Recording? I have an Activity Tracker that vibes with every ios notification unless “Show on Lock Screen” is disabled in Notification Settings.