Two-Factor authentication aims to strengthen the security for your Apple ID so that you’re the only person who can access your account, even though someone knows your password. If you launch two-factor authentication on iCloud, your account can only be accessed on devices you trust, like your iPhone, iPad, or Mac. If you want to sign in a new device for the first time, you will need to provide you passward and the verification code at the same time. Because your password alone is no longer enough to access your account, two-factor authentication largely improves the security of your Apple ID and all the personal information you store with Apple. After learning some basic knowledge about two-factor authentication, we come to the topic on how to turn on two factor authentication option on iPhone.
How to Turn on Two Factor Authentication Option on iPhone?
Two-factor authentication is available to iCloud and iTunes users with at least one device that’s using the iOS 9 and higher or macOS 10.11 and higher. You can follow these steps on your iPhone, iPad, or iPod touch to turn on two-factor authentication.
Turn on Two Factor Authentication in Settings
If you’re using iOS 10.2 or earlier:
- Go Settings > Click iCloud option.
- Tap your Apple ID > Choose Password & Security.
- Tap Turn On Two-Factor Authentication option.
- Tap Continue.
If you’re using iOS 10.3 or later:
- Please go to Settings >Click [Your Name] > Choose Password & Security.
- Choose Turn On Two-Factor Authentication Option.
- Click Continue Option.
Enter and Verify Your Trusted Phone Number
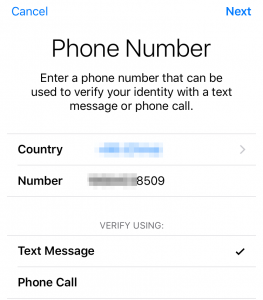
1. Please enter the phone number where you want to receive verification codes when you sign in. You can choose to receive the codes by text messages or automated call.
2. When you tap Next, Apple sends a verification code to the phone number you provided.
3. Please enter the verification code to verify your phone number and turn on two-factor authentication.

How to Turn on Two Factor Authentication Option on iPhone